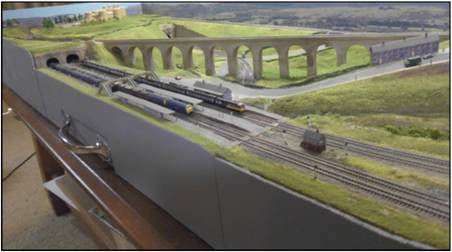
VIC - 0639 - Sarum Bridge - TCH 146
VIC – 0639 – Layout of the Quarter - Sarum Bridge – TCH 146

Sarum
Bridge is a little T Gauge exhibition layout I built during the first
half of 2014. This article describes it in its more-or-less complete form, as
shown at AMRA Caulfield in August 2014.
I have been
intrigued by the possibilities of Eishindo’s T Gauge
system ever since it first appeared a few years ago, but the product range was
very limited and there were enough technical problems that it didn’t seem worth
trying. A combination of four things pushed me over the edge: new
second-generation mechanisms that could actually run slowly, a very nice RTR
HST set, a decent range of hobbyist-produced 3D printed body shells in British
outline, and seeing Orbost - a large layout in a
totally different class from the typical T micro-layout.
It was
clear from the start that T is not a general-purpose scale - there are many
things you simply cannot do in it. Even reversing with a string of 4-wheel
wagons is better imagined than attempted. A few experiments also showed that
the points weren’t reliable enough for any sort of automatic running, especially
with 4 wheel wagons. This left some sort of simple roundy-roundy
design as the only viable option.
Background to T Gauge
I used T
Gauge flexi track throughout, but here there are some significant differences
from larger scales. The rails are steel, and the track tends to twist like a
corkscrew as soon as it is removed from its packing tube. This gets worse when
the track is bent into a curve. After a few experiments, I ended up gluing the
track down using superglue. Straight sections were aligned against a steel
rule, and glued about 18” at a time, pressing down with fingers and a wooden
block (moving them constantly to ensure they didn’t stick!). Curves were done
the same way, judging position by eye. These were not as successful, the short
drying time for the glue not leaving enough time to lay them properly parallel.
The rail
joiners are pairs of conventional fishplates mounted on fixed sections of six
sleepers. Each brass fishplate has a lug on the underside that can be bent down
and soldered to for power feeds. The track cuts easily with Xuron
cutters, and I also used these to cut rail breaks. A quick experiment with a
Dremel showed that this was not the way to go - sparks and bits everywhere -
the rail and sleepers are not strong enough to hold together under that sort of
stress.
Many people
use the set-track range rather than flexi track. This has integral ballast but
comes in very short pieces, so you get lots and lots of rail joints. The points
are manual only and quite crude, but probably OK if not using 4 wheel wagons or
automation.
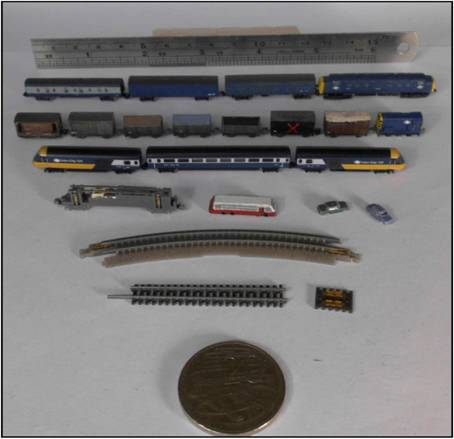
T Gauge
rolling stock is quite conventional in many ways, but has its own
peculiarities. Unusual aspects are magnetised pickup
and driven wheels for use with the steel rail; instead of the usual wheel/axle
box arrangement the wheel faces have hollows and the axle boxes have matching
lugs or dimples. This makes for a lot of
friction, so when combined with the limited hauling power of the locos it
really does limit maximum train lengths. Rerailing stock is surprisingly easy,
although it pays to ensure that there is a nice long unobstructed section of
straight track available (I use the viaduct). Couplers are very similar to N,
but a tight fit - pairs generally have to be squeezed together with tweezers to
ensure that vehicles are not lifted off the track. That is the trickiest part
of setting up a train.
Electrics
are just basic DC but running on 4.5V rather than 12V. For some reason, Eishindo chose to reverse the polarity - unlike all larger
scales which have the right rail positive, T has the left rail positive. The
track-to-wheels electrical pickup area is one of T’s problem areas, since this
is very, very sensitive to dirty wheels and track. For serious operation, all
trains should have at least two motor units (a full HST rake has 3). I chose to
permanently couple and wire together pairs of locos for my paper and goods
trains. This worked very well - over a two-day exhibition of continuous
stop/start running, I never had a stall and never had to clean the track (except
for my little one-motor DMU backup train). The locos had only a basic
superficial wheel clean overnight.
The basic
train set controller is a battery/mains PWM design, which also comes with two
optical sensors for auto-reverse. This allows you to set up basic shuttle,
station stop or station-stop-and-reverse systems straight out of the box. Alas,
this uses a full-speed / dead-stop approach, even though the computer-based
controller would be perfectly capable of smooth stops and starts.
The RTR
range consists of a decent collection of Japanese multiple unit stock, plus
very nice ICE and HST sets. These even have directional lighting. There are
also a number of different sizes of powered chassis, but all Bo-Bo bogie types.
They also have a variable-length coach chassis that you cut to length with a
pair of Xuron cutters and then fit the second bogie
into one of about ten positions. There is a quite a wide selection of
UK-outline 3D printed body shells available from different modellers
at Shapeways. The last time I looked, this included
classes 66, 55, 42, 25, 24, 08, GWR passenger and parcels railcars, A3, A4, C1,
Merchant Navy, Pannier, Jinty and Saddle-tanks, four
types of BR Mk1, suburban coaches, Siphon Gs and a good mix of generic
4-wheelers. There are also a handful of US and European prototypes, but the UK
is very well supported.
The only
local supplier I know of is Hobbies Plus down in Gippsland, who has a decent
range of track plus a few other oddments.
The main T
gauge supplier is undoubtedly tgauge.com (Alan Ramsay Models) in Edinburgh, and
the HST is proprietary to them. Service and response time is good, postage
costs not so good.
The Layout
The main
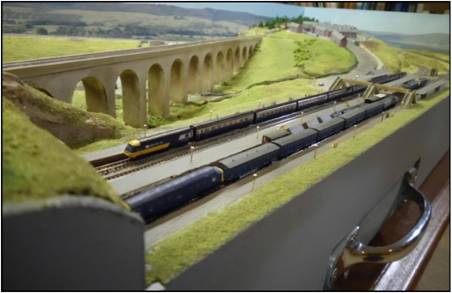
theme and inspiration for the layout was wanting to see a full length HST
crossing a long viaduct. This in turn really implied a main line setting, so
requiring either a double track or dog-bone. After a bit of thought, I settled
on a medium-sized wrapped dog-bone design, configured as an automatic
three-train tail chaser to provide a decent amount of running variety. Three
trains implied at least four block sections, so I decided to put in a four
platform station as well, with all stops performed at the platforms. Since this
would be where most of the visual activity occurred, this needed to be right at
the front of the layout.
The final
layout size was arbitrarily chosen as 4’8.5” x 1’8” (I like round numbers), or
approximately 1.5m x 0.5m. The OO equivalent would be 28’ x 10’. The dog-bone
is tightly wrapped so as to traverse the length of the board five times. The
total track length is 16m, equating to 4 miles or 7 km. With this type of layout, I am willing to
have one 180-degree curve visible at each end of the layout, but the design
required two plus a balloon loop each, so the tracks are effectively on three
levels. The maximum gradient is 1 in 30 on the back straight, with a minimum
visible curve radius of 7.5” (equivalent to 45” in OO).
Baseboard
construction is conventional, with a complete 3mm ply surface on a pine frame,
with a separate 3mm ply trackbed above this. No legs
are fitted - the layout is designed to sit on a table. Adequate clearance for
trains, fingers and track cleaners meant a minimum vertical clearance of 1”,
with access from the sides and two removable hilltops.
The automation
is handled by a PIC microcontroller (small computer). This reads eight optical
sensors (LDRs - Light Dependant Resistors), sited at each end of each of the
four platforms. One of each pair is a slowdown warning; the other is the stop
sensor. This computer handles all the block and signal logic, sending speed
commands to the speed control computer and driving all the signals directly.
The main control is a 4-position rotary switch, selecting stop, manual
(single-train train-set mode), auto1 (full block operation) and auto2 (full
block operation with the odd extra station stop). The speed control computer
provides 4 PWM controllers with inertia and overload detection. This handles
starts and stops.
The signals
are obsolete GWR searchlight types, each just a piece of optic fiber bent over
with a washer added to make a signal head, connected to multi-colour LEDs under the baseboard. The layout is fully signalled according to GWR practice, with each platform
having starter, home and distant signals. Three of these would be in the
tunnels, so only 9 are actually fitted. Two more signals protect the level
crossing.
The level
crossing works, with the mechanical gates driven directly by four cheap servos.
Another small computer handles this task according to instructions from the
main signal computer. The gates are pieces of clear plastic or acetate with the
timbers scribed on and painted. These are quite strong, and have on occasions
been hit by trains or vice versa.
The roads
are a linear motor product by IDL motors. Each oval track consists of about 230
coils on a double-sided circuit board. These are driven in sequence by IDL’s
control box, and effectively form a magnetic conveyor belt. Road vehicles all
have two or four magnets underneath to maintain directional stability. I have
added an extra layer of control to join the two tracks into a figure 8, switch
vehicles back and forth between them, pause them for random intervals in a
hidden section of one track (a fiddle yard!), handle collision avoidance, etc. The
supplied buses were to correct scale for T so I simply repainted them; the cars
were grossly overscale, so I transferred their magnets to proper scale T gauge
cars.
The viaduct
is a piece of pine timber, the arches cut with a hole saw and the pillars then
cut to match, with the whole thing faced by plasticard
stone walling. Tunnels and other civil engineering are just the same simple
stone plasticard cutouts stuck onto a plywood
foundation.
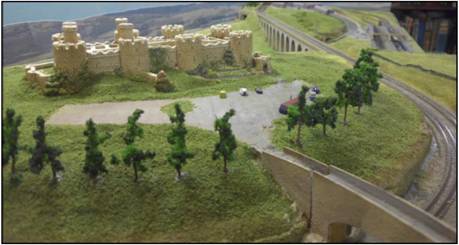
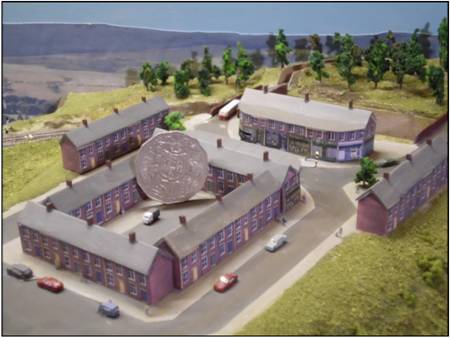
The
buildings are very crude models, but look reasonable at normal viewing
distance. They are basically just DIY card/paper kits. I searched the web for
suitable pictures (mostly of a block of OO terrace houses), then used Paint and
GIMP to edit these into sides that were stuck onto a suitably-sized block of
balsa. Roofs are Plastruct L-girders with styrene
strip for chimneys. The footbridge is made of plastruct
U-channel. Peco track pins make good station lights. Fences are etched brass
parts for ships’ railings, people are etched brass airline passengers. The
castle is a clay mantelpiece ornament of Conwy Castle
from Lilliput Lane.
Summary
T Gauge has
some major limitations, and is certainly not a general-purpose scale, but it really
is possible to build a decent and reliable British layout if you work to its
strengths. That basically means doing a display/exhibition or coffee table
style of layout.
Modelling
in T required learning some new techniques, but was significantly easier than
expected. I have often heard people say that it is too small, and that they
couldn’t work at that level of detail. I find that that is something of a furphy - a typical 12” viewing distance equates to 150m, so
you can get away with quite crude models. Given the amount of detail expected
with larger scale models, I find that those larger scale ones actually require
more fiddliness per square centimeter!
More
information, pictures and videos can be found at
-
http://modelrailmusings.weebly.com/
-
or by searching for Sarum Bridge in Google or
YouTube.

